


In this lesson we will learn to make Particles to Fluid Conversion with Fume FX as shown in the example below:
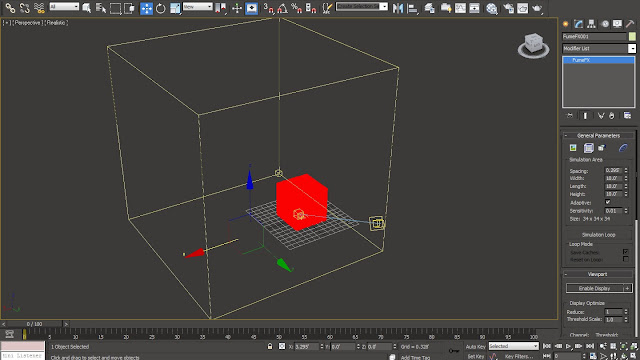
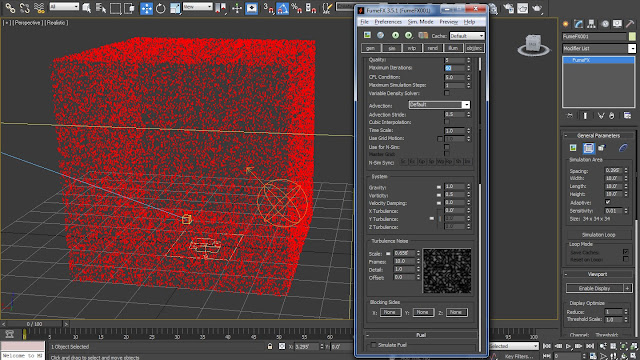
01 In this lesson we are going to convert the bunch of particles created in the last lesson to dissipate like smoke into nothing. So for that we have to take the help of Fume Fx. Dive inside the the 'Geometry' Roll-out inside the 'Create' panel and create a 'Fume FX' Container Grid around the Hero Object. Make sure that we are leaving enough space for the dissipate effect.
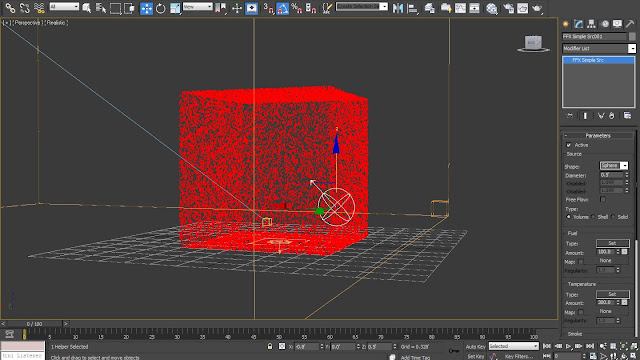
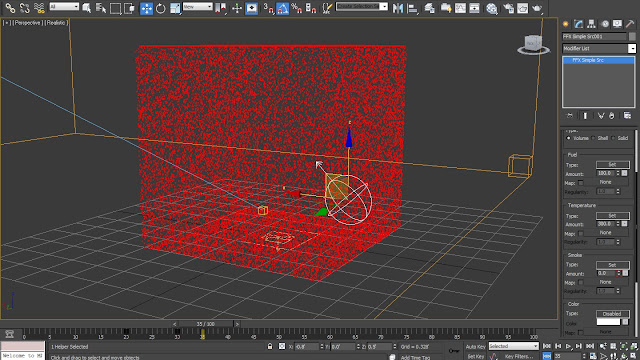
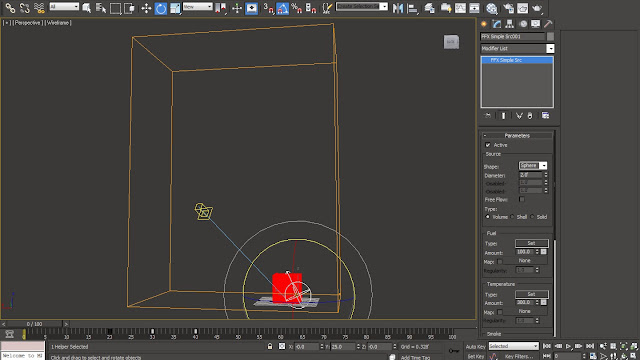
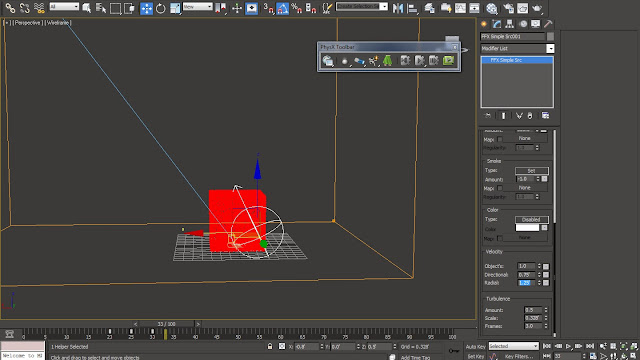
02 Create a Fume FX 'Simple Source' from the 'Helpers' Roll-out inside the 'Geometry' panel. As this is going to act as the trigger of dissipation, we will position it at the lower end corner of the particles.
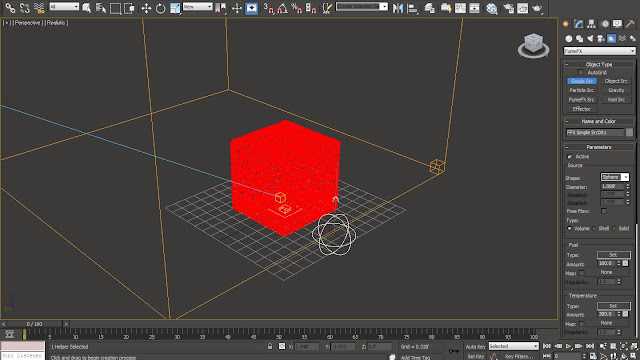
03 Decrease the 'Diameter' of the Simple Source to '0.5'. Also rotate it at a '45' degree angle in order to make the dispersion at that angle. Select the 'Fume FX' Container Grid and hit 'Open Fume FX UI' in order to access the Fume FX dialogue box.
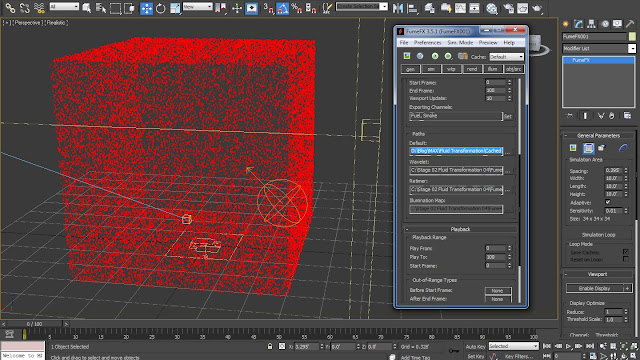
04 Access the 'Obj/Src' Parameter Dialogue Box from the Fume FX UI in order to add the 'Simple Src' into the Fume Fx 'Objects' list. Setup an Output Path for the cached simulation from the 'Gen' Parameter Dialogue Box by browsing the desired folder from the 'Default' Output Browser under the 'Paths' category.

05 Inside 'Simulation' Parameter Dialogue Box turn off the 'Simulate Fuel' option under the 'Fuel' category in order to forbid Fume FX from generating fire. Also decrease the 'Maximum Iterations' to 60 in order to generate faster result while working and checking the result again and again.
06 Select the 'Simple Src' object and access the 'Smoke' parameter in order to create a bust of smoke at a certain point by animating the 'Amount' parameter. Turn on the Auto Key and create an animation of 'Smoke' value remaining at '0.0' value from the first 20 frames, then increasing to the value of '3.0' at 30th frame and then again decreasing to '0.0' at 35th frame.
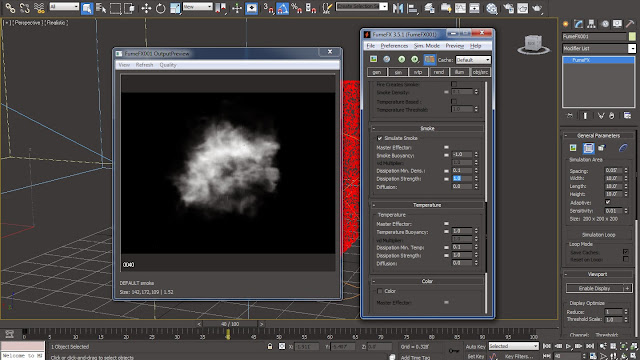
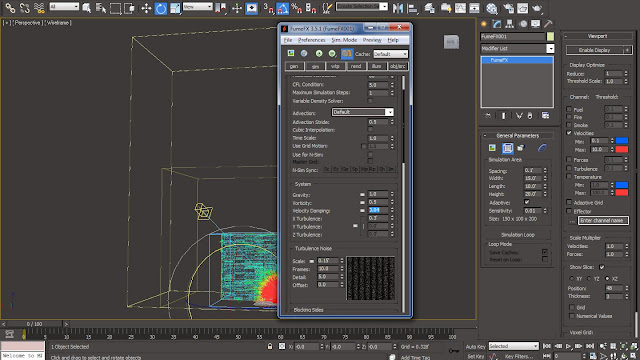
07 Jump back to the 'Gen' Parameter Dialogue Box and decrease the 'Spacing' value to '0.05' feet. Open up the preview window from the 'Open Preview Window' option and play back the simulation by hitting 'Start Default Simulation' option.
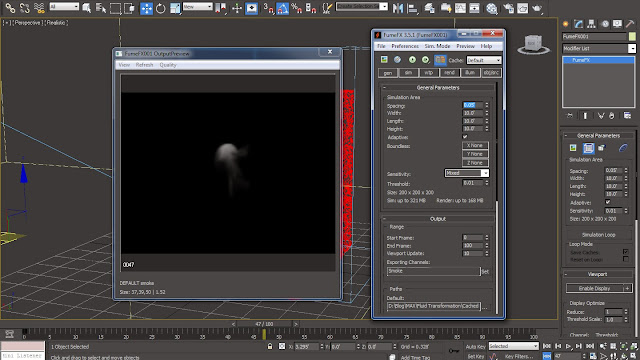
08 Play back the simulation in order to notice that the area where the smoke is getting generated is really small. Hence we are required to increase the 'Diameter' value of Sample Src to 2.0.

09 We will now give a bit of turbulence to the smoke by bringing up the 'X Turbulence' value to '0.3' feet from the 'Sim' Parameter Dialogue Box. Also decrease the 'Scale' Value inside 'Turbulence Noise' parameters to '0.15' feet while also increasing the 'Detail' level to '5.0'.
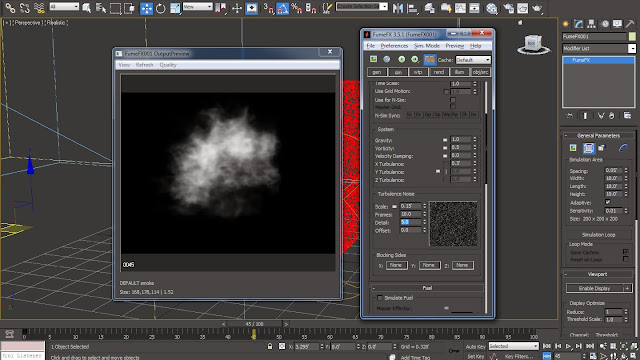
10 Move down to the 'Smoke' parameters in order to bring down the 'Dissipation Strength' value to '1.0'. Switch to 'Obj/Src' Parameter Dialogue Box and increase the 'Directional' velocity to '0.5' feet and 'Radial' Velocity to '1.0' feet from the 'Velocity' parameters.

06 Select the 'Simple Src' object and access the 'Smoke' parameter in order to create a bust of smoke at a certain point by animating the 'Amount' parameter. Turn on the Auto Key and create an animation of 'Smoke' value remaining at '0.0' value from the first 20 frames, then increasing to the value of '3.0' at 30th frame and then again decreasing to '0.0' at 35th frame.

07 Jump back to the 'Gen' Parameter Dialogue Box and decrease the 'Spacing' value to '0.05' feet. Open up the preview window from the 'Open Preview Window' option and play back the simulation by hitting 'Start Default Simulation' option.

08 Play back the simulation in order to notice that the area where the smoke is getting generated is really small. Hence we are required to increase the 'Diameter' value of Sample Src to 2.0.

09 We will now give a bit of turbulence to the smoke by bringing up the 'X Turbulence' value to '0.3' feet from the 'Sim' Parameter Dialogue Box. Also decrease the 'Scale' Value inside 'Turbulence Noise' parameters to '0.15' feet while also increasing the 'Detail' level to '5.0'.

10 Move down to the 'Smoke' parameters in order to bring down the 'Dissipation Strength' value to '1.0'. Switch to 'Obj/Src' Parameter Dialogue Box and increase the 'Directional' velocity to '0.5' feet and 'Radial' Velocity to '1.0' feet from the 'Velocity' parameters.

11 In order to visualize the simulation in view-port we will now add the 'Velocity' channel inside the 'Exporting Channels' parameter under the 'Gen' Parameter Dialogue Box. From the modify parameters of 'Fume FX Container Grid' turn on the 'Velocity' option which will fill the whole container grid with different colored lines (Vector Information) representing the area under the influence of fume as well as the empty area.
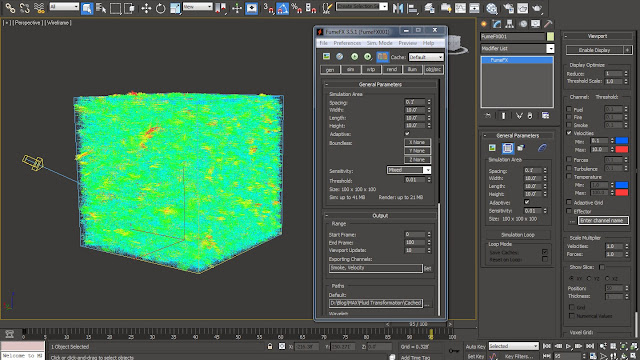
12 Now in order to make the view of the 'Fume FX Container Grid' less complicated we will turn on the 'Show Slice' option with 'XZ' orientation. Move the 'Slice' plane to the center of the box where the main action is happening by changing the 'Position' value to '48'. Also increase the 'Thickness' value to '5' in order to see the simulation in the 3D space and to get a better idea what the 'Velocity' information is doing.
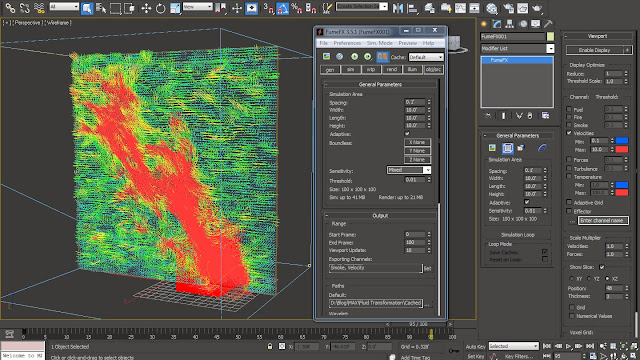
13 In the view-port we can now see the particles being pushed around and being sliced due to the small size of the 'Fume FX Container Grid' and angle of the 'Fume FX Simple Source'. Hence we will now reposition and re-size our 'Fume FX Container Grid' by increasing the 'Width' and 'Height' values inside the 'Gen' Parameter Dialogue Box to '15.0' feet and '20.0' feet respectively. Also change the orientation of the 'FFX Simple Src' to '25.0' degrees in 'Y' axis.
14 Under the 'Sim' Parameter Dialogue Box bring down the 'Temperature Buoyancy' to '0.5' from the 'Temperature' parameters. In order to apply some diminution to the velocity attribute we will bring up the value 'Velocity Damping' from the 'System' parameters to '0.04'.
15 Select the 'FFX Simple Src' object in order to tweak the fume burst animation a bit. Move the middle key-frame to 'frame no. 25' and the last key-frame to 'frame no. 30'. Inside its 'Velocity' parameters increase the 'Directional' and 'Radial' parameters to the value of '0.75' and '1.25' respectively.
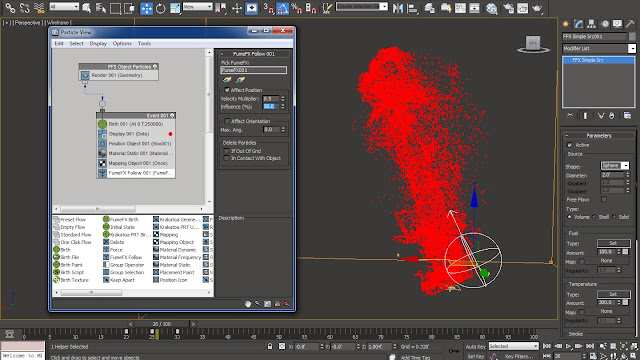
16 We are going to use this simulation as a way to drive the animation of our particles. So in order to do that we will now append a 'Fume FX Follow' operator inside the 'Event 001' node under the 'Particle View' Graph Editor. Load the 'Fume FX Container Grid' to 'Fume FX Follow' operator from the 'Pick Fume FX Dynamics' tool inside its parameters.
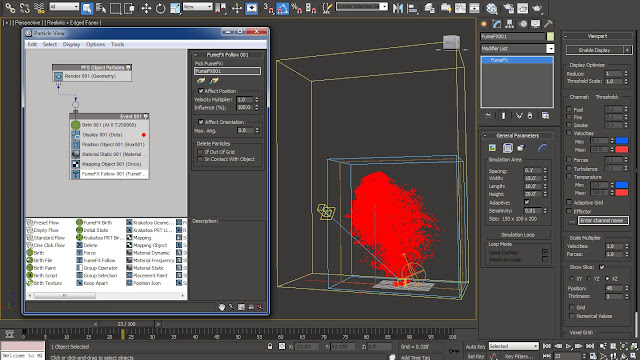
17 If the particles are getting pushed outside the container grid all we have to do is to readjust the 'Fume FX Container Grid' as well as the 'FFX Simple Src Object'. Inside the 'Fume FX Follow' parameters bring down the 'Velocity Multiplier' and 'Influence %' to '0.5' and '50.0' respectively.

12 Now in order to make the view of the 'Fume FX Container Grid' less complicated we will turn on the 'Show Slice' option with 'XZ' orientation. Move the 'Slice' plane to the center of the box where the main action is happening by changing the 'Position' value to '48'. Also increase the 'Thickness' value to '5' in order to see the simulation in the 3D space and to get a better idea what the 'Velocity' information is doing.

13 In the view-port we can now see the particles being pushed around and being sliced due to the small size of the 'Fume FX Container Grid' and angle of the 'Fume FX Simple Source'. Hence we will now reposition and re-size our 'Fume FX Container Grid' by increasing the 'Width' and 'Height' values inside the 'Gen' Parameter Dialogue Box to '15.0' feet and '20.0' feet respectively. Also change the orientation of the 'FFX Simple Src' to '25.0' degrees in 'Y' axis.

14 Under the 'Sim' Parameter Dialogue Box bring down the 'Temperature Buoyancy' to '0.5' from the 'Temperature' parameters. In order to apply some diminution to the velocity attribute we will bring up the value 'Velocity Damping' from the 'System' parameters to '0.04'.

15 Select the 'FFX Simple Src' object in order to tweak the fume burst animation a bit. Move the middle key-frame to 'frame no. 25' and the last key-frame to 'frame no. 30'. Inside its 'Velocity' parameters increase the 'Directional' and 'Radial' parameters to the value of '0.75' and '1.25' respectively.

16 We are going to use this simulation as a way to drive the animation of our particles. So in order to do that we will now append a 'Fume FX Follow' operator inside the 'Event 001' node under the 'Particle View' Graph Editor. Load the 'Fume FX Container Grid' to 'Fume FX Follow' operator from the 'Pick Fume FX Dynamics' tool inside its parameters.

17 If the particles are getting pushed outside the container grid all we have to do is to readjust the 'Fume FX Container Grid' as well as the 'FFX Simple Src Object'. Inside the 'Fume FX Follow' parameters bring down the 'Velocity Multiplier' and 'Influence %' to '0.5' and '50.0' respectively.

0 comments:
Post a Comment