


This lesson will take us through the process of rigging and animating the 3D model of a fish inside 3DS Max while we also go through the process of creating a fish school swimming in the ocean. For rigging the fish model we will use a free max script easily available on the internet, 'Spring Magic'. While we will generate the basic Fish School effect by using 3DS Max's Particle System.
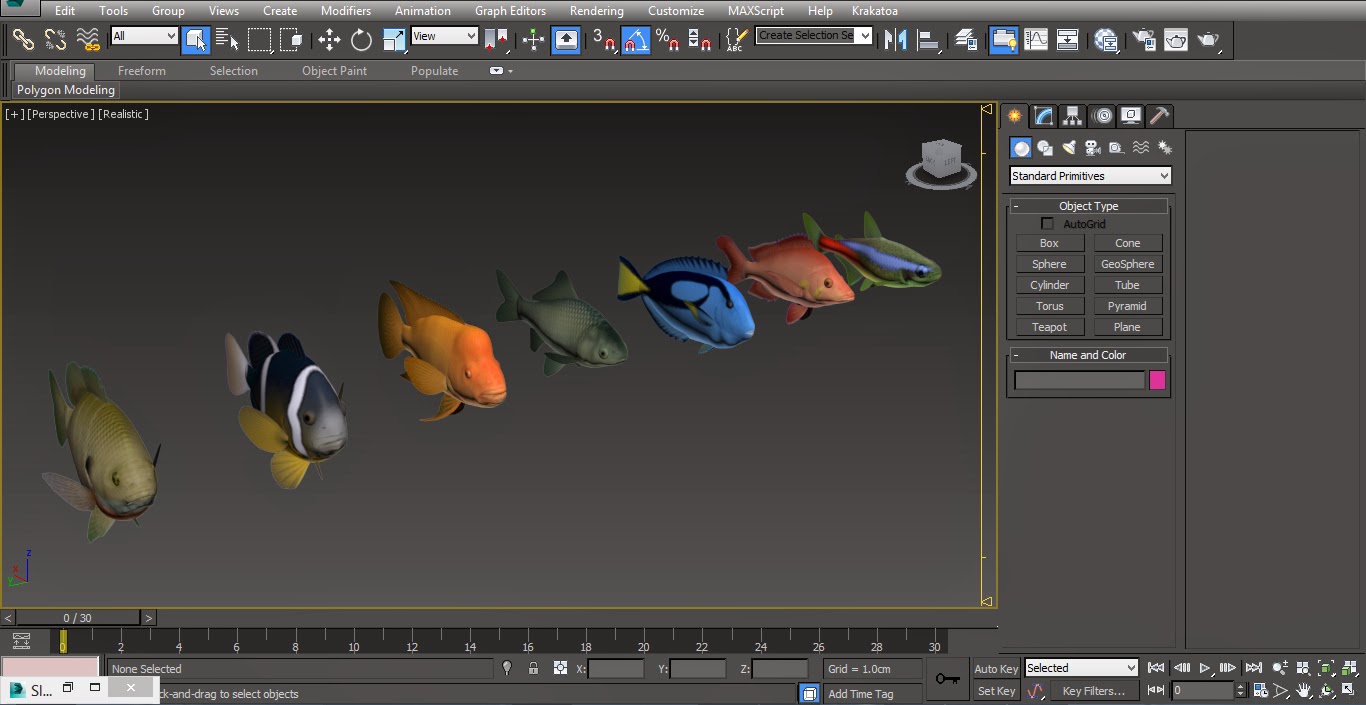
01 Fire up the 3DS Max scene file 'DFX_Fish_Flock_01.max' from the project folder where we have a set of 7 fishes ready for the rigging process. These models of the fishes have already been textured and shaded to save us our precious time, as we would like to concentrate on core rigging and animation parts in this lesson.
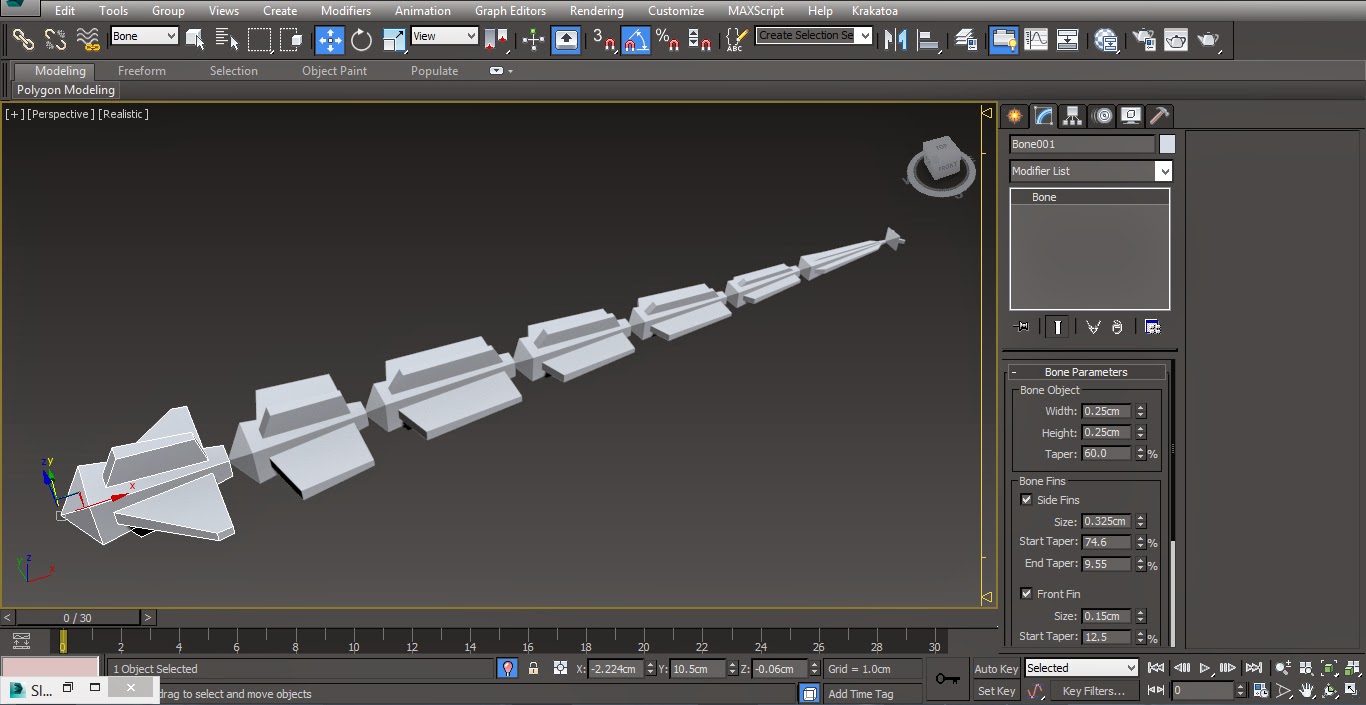
02 Select and isolate the '01_DFX_Blue_Gill_Fish' and start creating a rig for it using the bones object. We will start creating the bone chain from head to tail with at least 7 to 8 bones in the rig. Adjust each Bone's Height and Width and the size of the Side, Front and Back fins in such a way that the bones gets thinner and thinner as they reaches the tail of the fish model.
03 Once we are done with the setup of the bone chain we will select body of the fish and apply a skin modifier onto it from the modifier drop down list. Click on ‘Add’ option inside the ‘Parameters’ tab of ‘Skin’ modifier and select all the Bone objects that we made for the fish in order to link them to the fish geometry. The default distribution of the envelopes does not need any sort of adjustments as we are having one complete mesh of the fish.

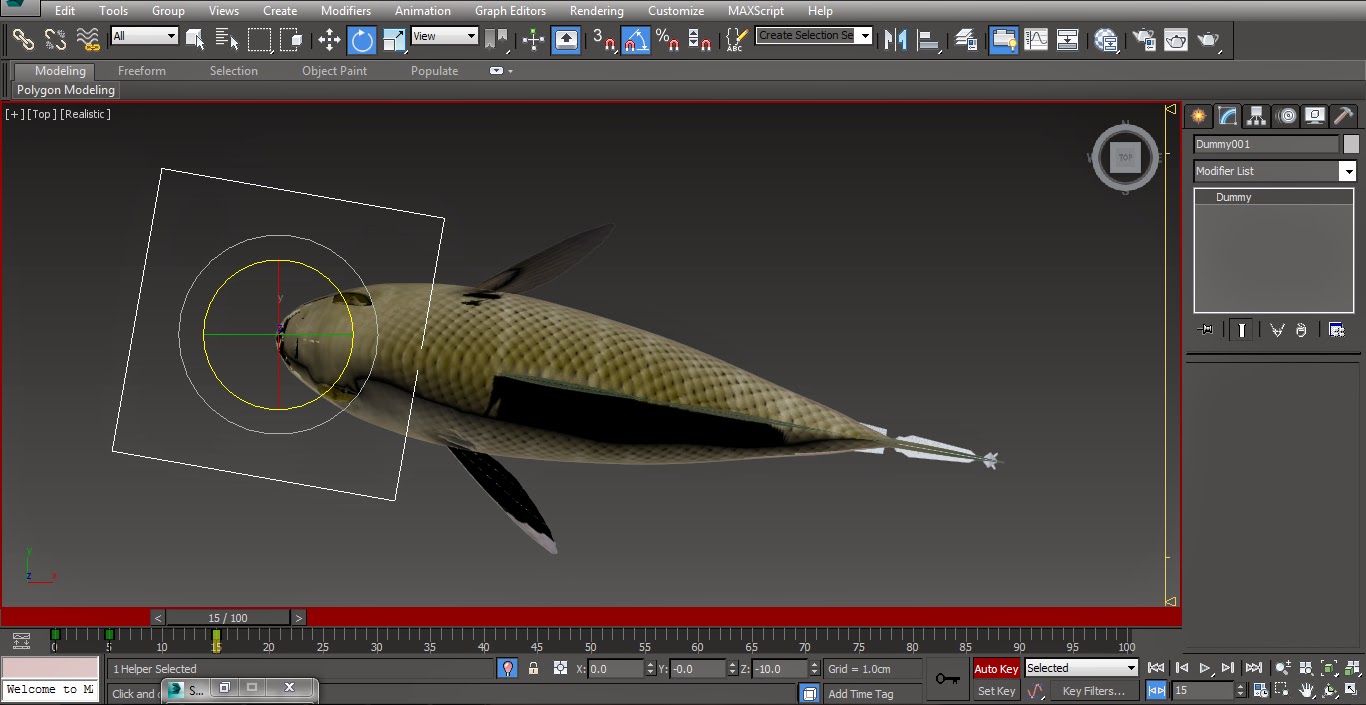
04 Add in a ‘Dummy’ Helper to the front of the bone chain and link the front bone i.e. ‘Bone001’ to it in order to make this ‘Dummy Object’ the main parent object of the chain rig setup. Now we will animate the rotation parameter of the Dummy object in order to replicate the head movement of the fish. Turn on the ‘Auto key’ and create key-frames at the 5th and 15th frame on the time line with the rotation angle of ‘10’ and ‘-10’ on the Z axis.
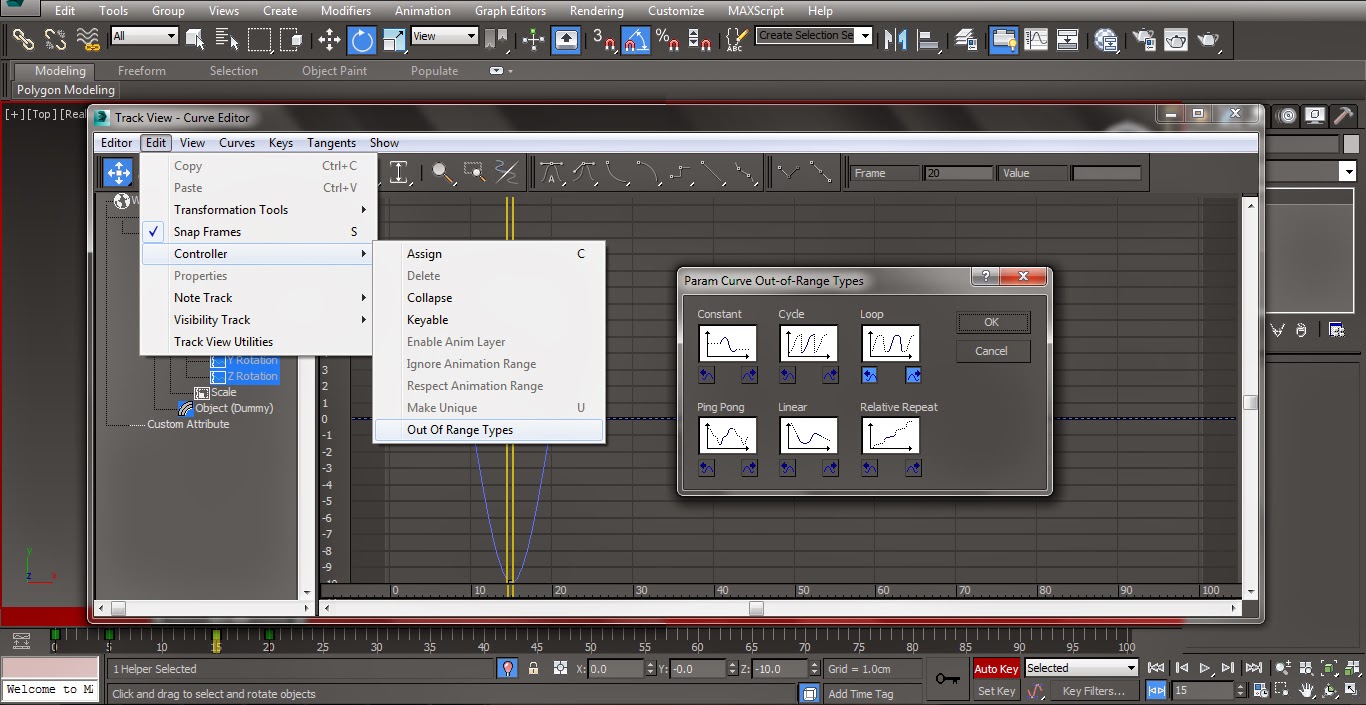
05 In order to replicate the same motion till the end of the time line we will make the current animation end at the same frame from where it started. So in order to do that, we will duplicate the first key-frame onto the 20th frame of the timeline. And from the Curve Editor window we will choose ‘Loop’ as the ‘Out of Range Type’. Smoothen up the edges on the curve using the Bezier handles in order to get rid of the jitters if any.
06 We now have the animation till the end of the timeline thanks to the ‘Curve Editor’ dialogue box. So now in order to apply the script onto the dummy animation we will hit the ‘Run Script’ command from the ‘Max Script’ menu while the Dummy object is still selected inside the scene. Browse the project folder and load in the ‘springmagic_0.9_0.mse’ max script file.

07 Before applying the Spring Magic script select the ‘Bone001’ object and change the ‘Key-Range’ to ‘Custom’ while increasing the end frame value to ‘1000’. This will increase the duration of the animation that we will generate through this script to 1000 frames. Now select the ‘Bone001’ object and from the ‘Spring Magic’ dialogue box hit ‘Bone’ from the ‘Apply’ settings in order to bake the spring animation onto the Bone Chain Rig.

08 Right click in the viewport and select ‘End Isolate’ mode in order to unhide the rest of the fishes in the scene. Now in order to duplicate the rigging and animation of the first fish onto the others, we will create the duplicate of the chain rig setups along with the dummy object and start placing them one by one onto the centre of each of the remaining fish geometries.

09 Select each of the fish geometry one by one and apply the ‘Skin’ modifier while adding in the bones of their respective Bone Chains. Once we are done rigging up the fish geometries with their respective bone Chains we will hide all the Bone and Dummy objects while leaving only the fish geometries visible inside the scene.

10 We will now create a ‘PF Source’ Particle System in the scene with the Icon Length and Width set to ‘200’ by ‘200’ cm respectively. Open up the ‘Particle View’ window and select the ‘Birth’ sub event in order to edit the particle count and life of each particle. Bring up the value of ‘Emit Stop’ and ‘Amount’ parameter to ‘1000’ and ‘250’ respectively while bringing down the ‘Emit Stop’ value to ‘-100’.

11 Delete the ‘Rotation’ sub event in order to get rid of any kind of rotation information from the particles. Replace the ‘Shape’ sub event with the ‘Shape Instance’ by using the ‘Insert’ command from the right click menu option of the particle view. Before proceeding further with the Shape Instance options create a group of all the fish geometries with the name ‘Fishes’, and then load this group inside the ‘Particle Geometry Object’ option.

12 Now in order to randomise the fish particles look we will start by choosing the ‘Separate Particles for Group Members’ option while also activating the ‘Animate Shape’ option with the ‘Random Offset’ value of ‘45’ frames. Also from the ‘Shape Instance’ sub event parameters randomize the scale of the fishes by decreasing the ‘Scale%’ and ‘Variation’ value to ‘150’ and ‘20’ respectively.

01 Fire up the 3DS Max scene file 'DFX_Fish_Flock_01.max' from the project folder where we have a set of 7 fishes ready for the rigging process. These models of the fishes have already been textured and shaded to save us our precious time, as we would like to concentrate on core rigging and animation parts in this lesson.
02 Select and isolate the '01_DFX_Blue_Gill_Fish' and start creating a rig for it using the bones object. We will start creating the bone chain from head to tail with at least 7 to 8 bones in the rig. Adjust each Bone's Height and Width and the size of the Side, Front and Back fins in such a way that the bones gets thinner and thinner as they reaches the tail of the fish model.
03 Once we are done with the setup of the bone chain we will select body of the fish and apply a skin modifier onto it from the modifier drop down list. Click on ‘Add’ option inside the ‘Parameters’ tab of ‘Skin’ modifier and select all the Bone objects that we made for the fish in order to link them to the fish geometry. The default distribution of the envelopes does not need any sort of adjustments as we are having one complete mesh of the fish.
04 Add in a ‘Dummy’ Helper to the front of the bone chain and link the front bone i.e. ‘Bone001’ to it in order to make this ‘Dummy Object’ the main parent object of the chain rig setup. Now we will animate the rotation parameter of the Dummy object in order to replicate the head movement of the fish. Turn on the ‘Auto key’ and create key-frames at the 5th and 15th frame on the time line with the rotation angle of ‘10’ and ‘-10’ on the Z axis.
05 In order to replicate the same motion till the end of the time line we will make the current animation end at the same frame from where it started. So in order to do that, we will duplicate the first key-frame onto the 20th frame of the timeline. And from the Curve Editor window we will choose ‘Loop’ as the ‘Out of Range Type’. Smoothen up the edges on the curve using the Bezier handles in order to get rid of the jitters if any.
06 We now have the animation till the end of the timeline thanks to the ‘Curve Editor’ dialogue box. So now in order to apply the script onto the dummy animation we will hit the ‘Run Script’ command from the ‘Max Script’ menu while the Dummy object is still selected inside the scene. Browse the project folder and load in the ‘springmagic_0.9_0.mse’ max script file.
07 Before applying the Spring Magic script select the ‘Bone001’ object and change the ‘Key-Range’ to ‘Custom’ while increasing the end frame value to ‘1000’. This will increase the duration of the animation that we will generate through this script to 1000 frames. Now select the ‘Bone001’ object and from the ‘Spring Magic’ dialogue box hit ‘Bone’ from the ‘Apply’ settings in order to bake the spring animation onto the Bone Chain Rig.
08 Right click in the viewport and select ‘End Isolate’ mode in order to unhide the rest of the fishes in the scene. Now in order to duplicate the rigging and animation of the first fish onto the others, we will create the duplicate of the chain rig setups along with the dummy object and start placing them one by one onto the centre of each of the remaining fish geometries.
09 Select each of the fish geometry one by one and apply the ‘Skin’ modifier while adding in the bones of their respective Bone Chains. Once we are done rigging up the fish geometries with their respective bone Chains we will hide all the Bone and Dummy objects while leaving only the fish geometries visible inside the scene.
10 We will now create a ‘PF Source’ Particle System in the scene with the Icon Length and Width set to ‘200’ by ‘200’ cm respectively. Open up the ‘Particle View’ window and select the ‘Birth’ sub event in order to edit the particle count and life of each particle. Bring up the value of ‘Emit Stop’ and ‘Amount’ parameter to ‘1000’ and ‘250’ respectively while bringing down the ‘Emit Stop’ value to ‘-100’.
11 Delete the ‘Rotation’ sub event in order to get rid of any kind of rotation information from the particles. Replace the ‘Shape’ sub event with the ‘Shape Instance’ by using the ‘Insert’ command from the right click menu option of the particle view. Before proceeding further with the Shape Instance options create a group of all the fish geometries with the name ‘Fishes’, and then load this group inside the ‘Particle Geometry Object’ option.
12 Now in order to randomise the fish particles look we will start by choosing the ‘Separate Particles for Group Members’ option while also activating the ‘Animate Shape’ option with the ‘Random Offset’ value of ‘45’ frames. Also from the ‘Shape Instance’ sub event parameters randomize the scale of the fishes by decreasing the ‘Scale%’ and ‘Variation’ value to ‘150’ and ‘20’ respectively.
0 comments:
Post a Comment