


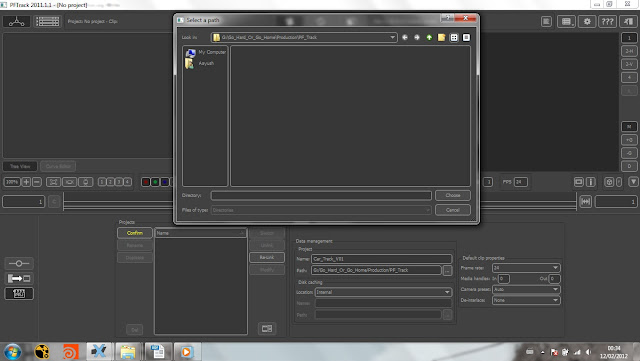
01. We will start our work in PFTrack-2011 by creating a project from the 'Project panel' and clicking onto the 'Create' tab. Browse for the desired folder where we want to save our project from the 'Path' column and click 'Choose'. Give the project an appropriate name before clicking 'Confirm'.
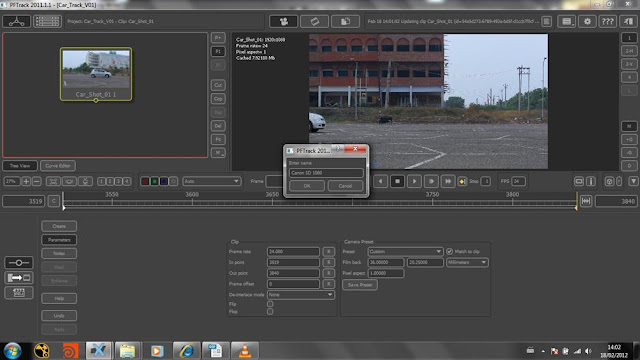
02. Last step directly brought us onto Create Panel where we will get all the important options in PFTrack-2012. We have also being presented with the three views on the interface with the 'Tree View' on our left, 'Media Bin' at the middle and 'File Browser' at the right. Browse the files that we want to import to the project from the 'File Browser' panel, and then drag them one by one inside the 'Media Bin' where we can create our own library of footages. Eventually drag n drop the main footage in the 'Tree View' to load the footage into the project.

03. Switch to 'Cinema view' from the 'Camera icon' (Top Centre Panel) to see the footage in the view-port. Press Play from the buttons below the Cinema View in order to playback the footage in the viewer. This will turn the time-line into green indicating the cached number of frames which will make the playback faster. We can increase the Cache size from the 'Edit Preferences' icon on the upper right side of the window. Footage playback is always very important as it enables us to check whether we have enough information in the footage for the Auto-track features to hold on or not.

04. Before we go any further it is always important to tell PF Track that which camera we were using, or what was the size of the film back while shooting. We can feed in the 'Film back' and 'Pixel aspect' values into the 'Camera Preset' Section after choosing 'Custom' preset under Parameters.
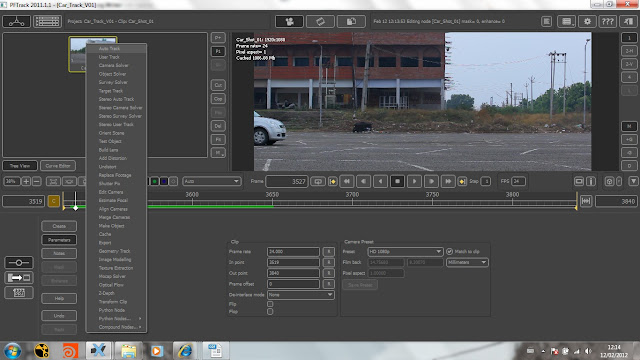
05. The next step will be to apply the 'Auto-Track' node onto the footage node. Right click on footage node in the tree view and select Auto-Track from the list. This will activate the 'Parameters Panel' where we can find all the parameters of the Auto-Track.
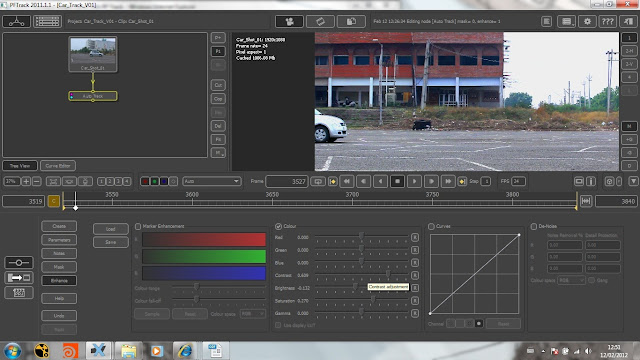
06. Before starting to auto-track our footage we would like to enhance our footage a bit so that it will be easier for the auto-track feature to understand our footage. This step is necessary if there is not much information for the tracking markers to stick onto the footage. Click on Enhance tab and check Colour column in order to enable the image manipulation settings.
07. Whenever we get a moving object in the scene obscuring the tracking points it is always recommended to mask it out before starting to auto-track. Create a mask around the object from the 'Mask' section and select the desired shape to draw the mask. We can create multiple masks to eliminate different moving objects in the footage. We can edit the mask manually by clicking onto each point or we can select multiple points on the mask from 'Marquee' tool and apply 'Group' in order to edit a bunch of points together.
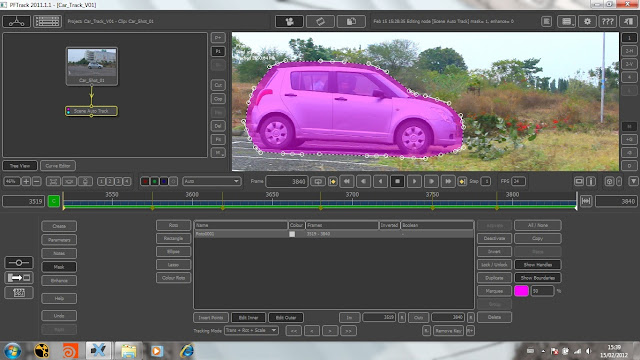
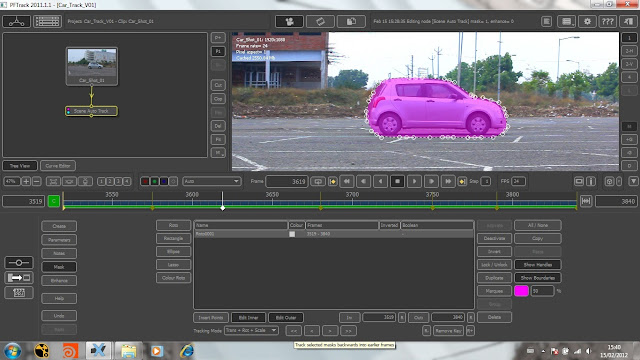
08. We can track the mask from the tracking options at the bottom of Mask parameters, which will help us in gluing the mask with the moving object in the footage. We can also select the Tracking Mode in order to tell PF-Track about the area that it should focus more. Click on 'Track selected masks forwards into later frames' or 'earlier frames' in order to start tracking the mask forward or backward respectively.
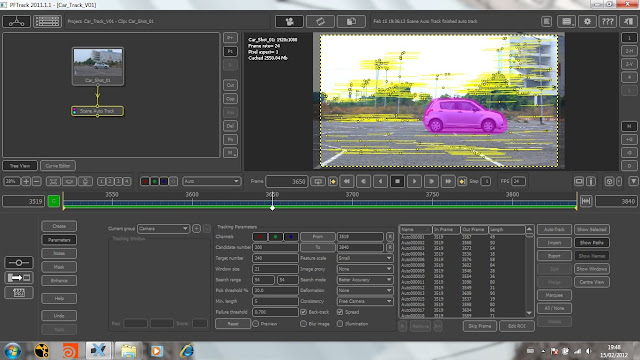
09. Before tracking we should eliminate the highly contrasting points on the edge of the footage, as they can produce many tracking points jumping on and off on the edge of the footage. These tracking points can stay stick over the edges looking for the contrast between white and black. So to fix that we need to stop the tracking points from going towards the edge of the frame by selecting the 'Edit ROI' option from the 'Preferences' section and giving the Auto Tracking Features a certain 'Region of Interest' to limit the tracking from going out of that region.

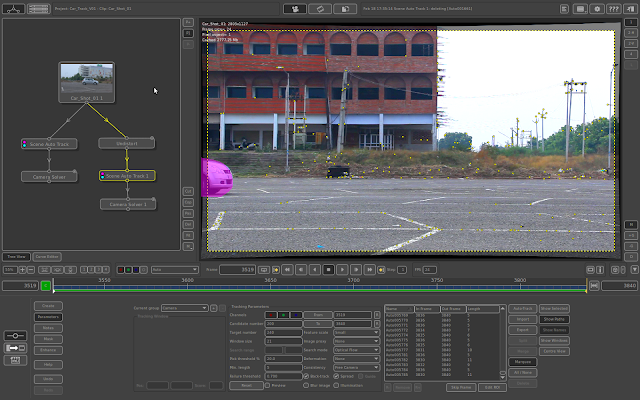
10. Increase the Candidate Number and Target Number according to the requirement of the scene i.e. if we have enough track-able points on the footage or not. Change the Search mode to Better Accuracy for tracking the footage effectively, but this may take more time. Click Auto-Track to start the tracking process.
11. After the tracking process is over look for the tracking features those can be dangerous for camera solution. Select and delete the features those are drifting away or are having a solid jitter. Like in this case we have a man walking across during the last few frames. Select and delete the features from the man with the 'Marquee' tool to get rid of inappropriate features for a perfect camera solution. Also delete the tracking features from the red flower plant in the end as it is moving a bit due to wind.

12. Never forget to delete the tracking features those are generated due to the intersection between two lines from two separate objects at a greater distance. Like in this case we have some points made out of an edge generated because of a parallax from electricity poles and the background building.

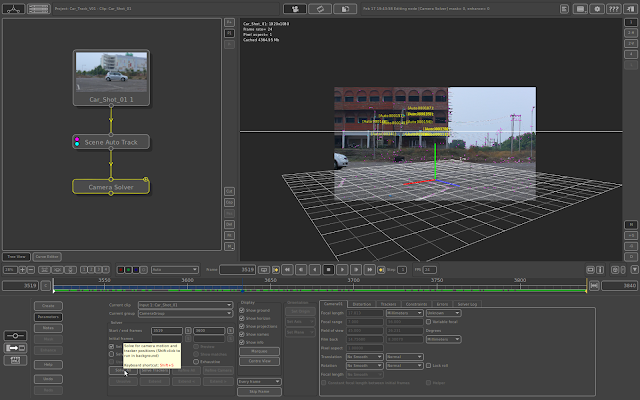
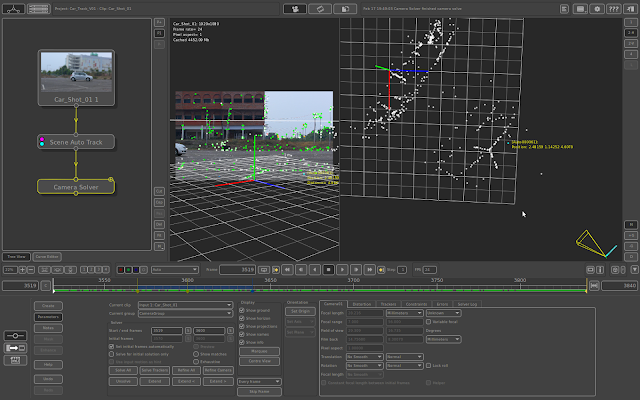
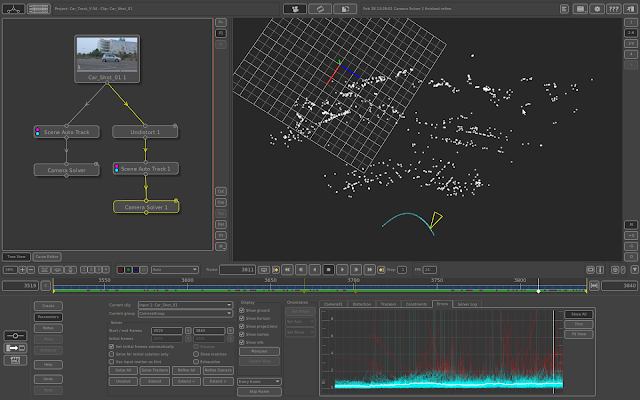
13. Next step will be to connect the Camera Solver to the Auto Track in order to extract the camera simulation. Set the solver start/end frames to the desired number of frames and hit 'Solve All'. Once we get the camera simulation switch to top view in order to see the Camera Trajectory and Point Cloud format.
14. In the perspective view we will notice that the point cloud generated by the camera solver is showing curved results for the geometry. This problem is because of lens distortion, which can result in some terrible camera solution and point cloud generation. So to get rid of this problem we will apply an 'Undistort' node to the footage before applying Auto Track. As PF-Track 2011 is completely node based we are quite lucky to apply any tool at any stage of our project.
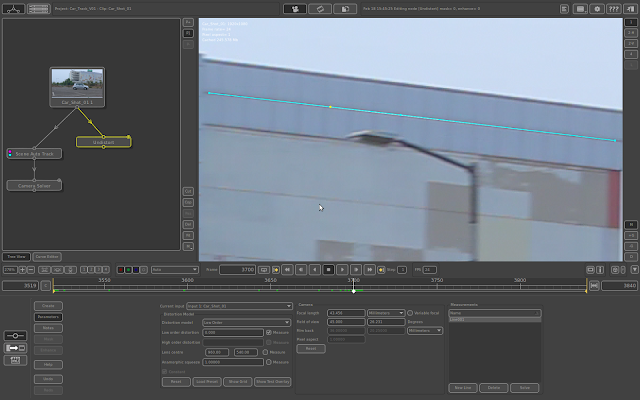
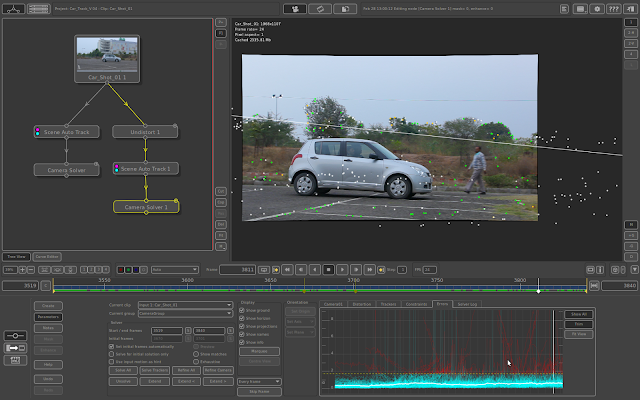
15. We need to find something in the shot that we know is a horizontal straight line and use that to undistort this shot. We have something like that in the form of a building in the middle of the shot. So now we will attach an 'Undistort' node to the footage and under it's parameters we will select 'New Line'. Trace the most clearly visible horizontal line over the building. Adjust the line with more segments as it is going to provide PF Track with all the information it needs to undistort the camera lens. It is always better to use multiple lines to undistort, but for now one is enough for this example.
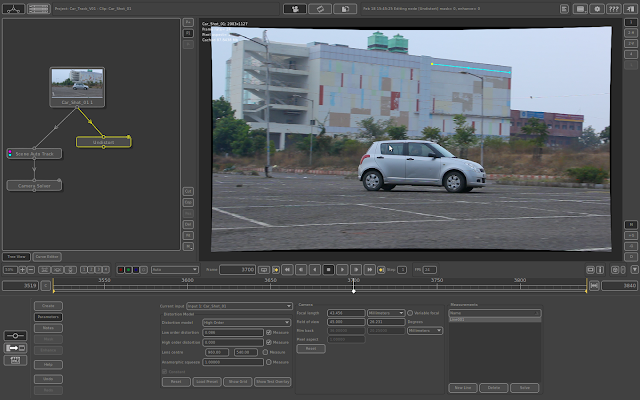
16. Finally hit solve with both Low Order and High Order 'Distortion Model' selected one by one. This will automatically expand the resolution of our footage to the size that it needs to be work on our 3D applications.
17. At this stage duplicate the current project so that we can preserve the current stage of the project and switch to it later if we want. Click on the 'Project Panel' and select the current project and hit Duplicate. Give an appropriate name to it and click confirm to finalize the duplication process. We can switch back to the current stage of the project in future by clicking onto the 'Switch' option.
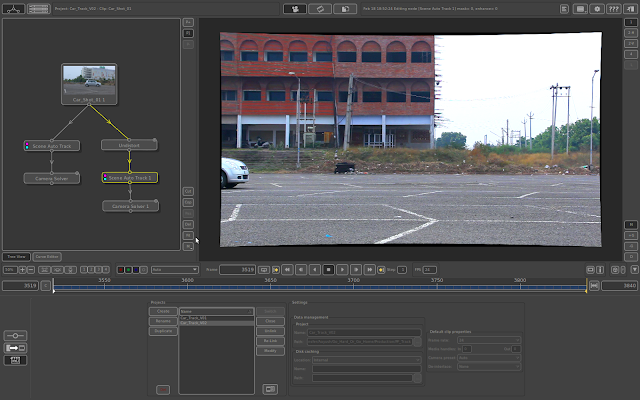
18. Copy and paste the Auto-Track and Camera Solver nodes in the Tree View and link them to the Undistort node. Repeat the steps 09, 11, 12 and 13. For the steps 12 and 13 we can select the tracking features that we think must have created the problem and start cleaning them one by one either by deleting them or by deleting the frames for them which are creating jerks in motion.
19. For example select a tracker from the trackers list and view it inside the tracking window. If the feature is leaving the track-able point during most of the frames we should 'Delete' it from the solution. But if the feature is leaving it only for few frames, then we can remove those frames by keeping the time-slider at that particular keyframe and selecting 'Remove All Earlier Keyframes' or 'Removing All Later Keyframes'.

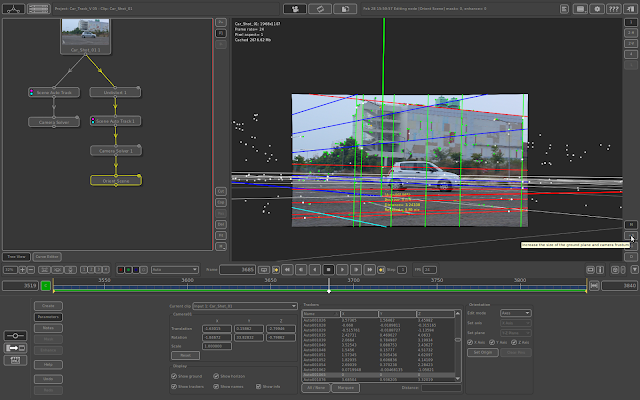
20. Once we are happy with the tracking features and believe that all the auto trackers are sticking to the sources we can start solving the camera. Set the start / end frames and hit solve all. After the camera solution we will notice that the ‘Camera Movement’ and ‘Point Cloud’ generated now is lot more accurate and logical. We have overcome the problem of lens distortion successfully.
21. If we are getting a huge number of Red and Orange dots we can further refine our solution from the 'Errors Column' inside the Camera Solver Parameters and use 'Trim' option to trim the error graph for getting a clean solution. After trimming select 'Refine All' in order to refine the solution.
22. Now our next step will be to orientate the camera by attaching the 'Orient Scene' node to the tree. Select a point on the road which we think can act as the Origin Point and Inside the Orient Scene parameters select 'Set Origin'. Select 'Axes' as the orientation method. Switch off the Y and Z Axis and set the lines for X axes over the Horizontal lines in the footage. After setting the X axes switch on the Y and Z axes and repeat the steps one after the another. After a satisfactory axes setup we will hit the 'Set Origin' option again.
23. Finally to check the accuracy of our scene we will drop in few test objects. Attach a 'Test Object' node and Double click on the desired test object that we want to drop in our scene. Select 'Place At Selected Feature' as the interaction mode and select the point in the scene where we want to place the test object. We can also scale and rotate it later by selecting the desired options from the Interaction Mode again.
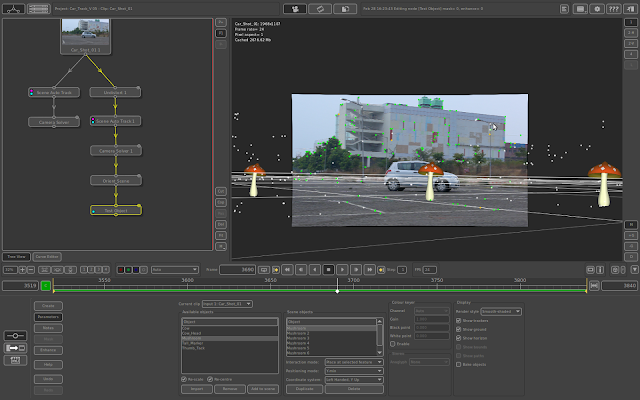
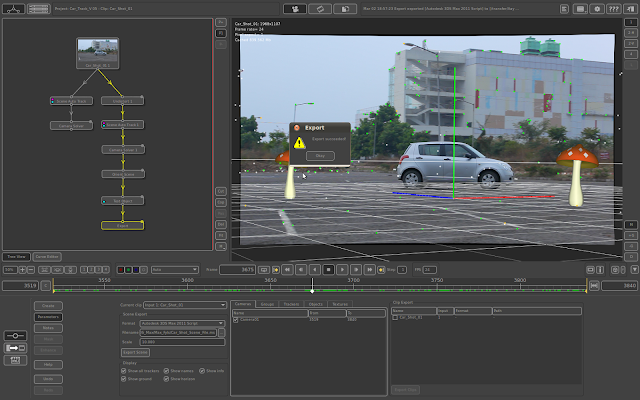
24. Now we are fine and ready to export the scene to any 3D Software Package that we want. Attach an ‘Export’ node to the tree and choose the desired ‘Format’ in which we want to save our file. Set the scale to 10 and hit ‘Export Scene’.

02. Last step directly brought us onto Create Panel where we will get all the important options in PFTrack-2012. We have also being presented with the three views on the interface with the 'Tree View' on our left, 'Media Bin' at the middle and 'File Browser' at the right. Browse the files that we want to import to the project from the 'File Browser' panel, and then drag them one by one inside the 'Media Bin' where we can create our own library of footages. Eventually drag n drop the main footage in the 'Tree View' to load the footage into the project.

03. Switch to 'Cinema view' from the 'Camera icon' (Top Centre Panel) to see the footage in the view-port. Press Play from the buttons below the Cinema View in order to playback the footage in the viewer. This will turn the time-line into green indicating the cached number of frames which will make the playback faster. We can increase the Cache size from the 'Edit Preferences' icon on the upper right side of the window. Footage playback is always very important as it enables us to check whether we have enough information in the footage for the Auto-track features to hold on or not.

04. Before we go any further it is always important to tell PF Track that which camera we were using, or what was the size of the film back while shooting. We can feed in the 'Film back' and 'Pixel aspect' values into the 'Camera Preset' Section after choosing 'Custom' preset under Parameters.

05. The next step will be to apply the 'Auto-Track' node onto the footage node. Right click on footage node in the tree view and select Auto-Track from the list. This will activate the 'Parameters Panel' where we can find all the parameters of the Auto-Track.

06. Before starting to auto-track our footage we would like to enhance our footage a bit so that it will be easier for the auto-track feature to understand our footage. This step is necessary if there is not much information for the tracking markers to stick onto the footage. Click on Enhance tab and check Colour column in order to enable the image manipulation settings.

07. Whenever we get a moving object in the scene obscuring the tracking points it is always recommended to mask it out before starting to auto-track. Create a mask around the object from the 'Mask' section and select the desired shape to draw the mask. We can create multiple masks to eliminate different moving objects in the footage. We can edit the mask manually by clicking onto each point or we can select multiple points on the mask from 'Marquee' tool and apply 'Group' in order to edit a bunch of points together.

08. We can track the mask from the tracking options at the bottom of Mask parameters, which will help us in gluing the mask with the moving object in the footage. We can also select the Tracking Mode in order to tell PF-Track about the area that it should focus more. Click on 'Track selected masks forwards into later frames' or 'earlier frames' in order to start tracking the mask forward or backward respectively.
09. Before tracking we should eliminate the highly contrasting points on the edge of the footage, as they can produce many tracking points jumping on and off on the edge of the footage. These tracking points can stay stick over the edges looking for the contrast between white and black. So to fix that we need to stop the tracking points from going towards the edge of the frame by selecting the 'Edit ROI' option from the 'Preferences' section and giving the Auto Tracking Features a certain 'Region of Interest' to limit the tracking from going out of that region.

10. Increase the Candidate Number and Target Number according to the requirement of the scene i.e. if we have enough track-able points on the footage or not. Change the Search mode to Better Accuracy for tracking the footage effectively, but this may take more time. Click Auto-Track to start the tracking process.

11. After the tracking process is over look for the tracking features those can be dangerous for camera solution. Select and delete the features those are drifting away or are having a solid jitter. Like in this case we have a man walking across during the last few frames. Select and delete the features from the man with the 'Marquee' tool to get rid of inappropriate features for a perfect camera solution. Also delete the tracking features from the red flower plant in the end as it is moving a bit due to wind.

12. Never forget to delete the tracking features those are generated due to the intersection between two lines from two separate objects at a greater distance. Like in this case we have some points made out of an edge generated because of a parallax from electricity poles and the background building.

13. Next step will be to connect the Camera Solver to the Auto Track in order to extract the camera simulation. Set the solver start/end frames to the desired number of frames and hit 'Solve All'. Once we get the camera simulation switch to top view in order to see the Camera Trajectory and Point Cloud format.

14. In the perspective view we will notice that the point cloud generated by the camera solver is showing curved results for the geometry. This problem is because of lens distortion, which can result in some terrible camera solution and point cloud generation. So to get rid of this problem we will apply an 'Undistort' node to the footage before applying Auto Track. As PF-Track 2011 is completely node based we are quite lucky to apply any tool at any stage of our project.

15. We need to find something in the shot that we know is a horizontal straight line and use that to undistort this shot. We have something like that in the form of a building in the middle of the shot. So now we will attach an 'Undistort' node to the footage and under it's parameters we will select 'New Line'. Trace the most clearly visible horizontal line over the building. Adjust the line with more segments as it is going to provide PF Track with all the information it needs to undistort the camera lens. It is always better to use multiple lines to undistort, but for now one is enough for this example.

16. Finally hit solve with both Low Order and High Order 'Distortion Model' selected one by one. This will automatically expand the resolution of our footage to the size that it needs to be work on our 3D applications.

17. At this stage duplicate the current project so that we can preserve the current stage of the project and switch to it later if we want. Click on the 'Project Panel' and select the current project and hit Duplicate. Give an appropriate name to it and click confirm to finalize the duplication process. We can switch back to the current stage of the project in future by clicking onto the 'Switch' option.

18. Copy and paste the Auto-Track and Camera Solver nodes in the Tree View and link them to the Undistort node. Repeat the steps 09, 11, 12 and 13. For the steps 12 and 13 we can select the tracking features that we think must have created the problem and start cleaning them one by one either by deleting them or by deleting the frames for them which are creating jerks in motion.

19. For example select a tracker from the trackers list and view it inside the tracking window. If the feature is leaving the track-able point during most of the frames we should 'Delete' it from the solution. But if the feature is leaving it only for few frames, then we can remove those frames by keeping the time-slider at that particular keyframe and selecting 'Remove All Earlier Keyframes' or 'Removing All Later Keyframes'.
20. Once we are happy with the tracking features and believe that all the auto trackers are sticking to the sources we can start solving the camera. Set the start / end frames and hit solve all. After the camera solution we will notice that the ‘Camera Movement’ and ‘Point Cloud’ generated now is lot more accurate and logical. We have overcome the problem of lens distortion successfully.

21. If we are getting a huge number of Red and Orange dots we can further refine our solution from the 'Errors Column' inside the Camera Solver Parameters and use 'Trim' option to trim the error graph for getting a clean solution. After trimming select 'Refine All' in order to refine the solution.

22. Now our next step will be to orientate the camera by attaching the 'Orient Scene' node to the tree. Select a point on the road which we think can act as the Origin Point and Inside the Orient Scene parameters select 'Set Origin'. Select 'Axes' as the orientation method. Switch off the Y and Z Axis and set the lines for X axes over the Horizontal lines in the footage. After setting the X axes switch on the Y and Z axes and repeat the steps one after the another. After a satisfactory axes setup we will hit the 'Set Origin' option again.

23. Finally to check the accuracy of our scene we will drop in few test objects. Attach a 'Test Object' node and Double click on the desired test object that we want to drop in our scene. Select 'Place At Selected Feature' as the interaction mode and select the point in the scene where we want to place the test object. We can also scale and rotate it later by selecting the desired options from the Interaction Mode again.

24. Now we are fine and ready to export the scene to any 3D Software Package that we want. Attach an ‘Export’ node to the tree and choose the desired ‘Format’ in which we want to save our file. Set the scale to 10 and hit ‘Export Scene’.

0 comments:
Post a Comment